Mastering Peppermint Hot Chocolate Cookies: Tips for Perfect Texture
The colder months bring with them an undeniable craving for warmth, comfort, and the festive cheer of the holiday season. Few treats capture this essence quite like peppermint hot chocolate cookies. Imagine a rich, fudgy chocolate cookie, studded with melting chocolate chips, pockets of gooey marshmallow, and bursts of cool, crisp peppermint. It's truly a winter wonderland in cookie form, an edible embrace that transports you straight to cozy firesides and joyful gatherings. While the flavor combination of chocolate and peppermint is undeniably a holiday superstar, achieving the ideal texture is what elevates these cookies from good to absolutely unforgettable. We're talking chewy centers, slightly crisp edges, and that signature melt-in-your-mouth marshmallow experience. This guide will walk you through the essential tips to ensure your peppermint hot chocolate cookies boast the perfect texture every single time.
The Foundation of Flavor & Texture: Key Ingredients Explained
Success in baking begins long before the oven preheats, specifically with the quality and preparation of your ingredients. For peppermint hot chocolate cookies, each component plays a crucial role in the final texture.
- Unsweetened Cocoa Powder vs. Hot Chocolate Mix: This is a critical distinction for texture and flavor. Using unsweetened cocoa powder is paramount. It delivers that deep, dark chocolatey flavor and contributes to a rich, brownie-like texture. Hot chocolate mix, on the other hand, contains sugar and often milk solids, which can throw off the delicate balance of your recipe, leading to a cakier, less intense cookie. For a truly authentic and irresistible experience, stick to the unsweetened variety.
- Butter at Room Temperature: This seemingly minor detail is a game-changer. Room temperature butter (soft enough to indent with a finger, but not melted) creams beautifully with sugar, creating tiny air pockets. These pockets are essential for a light, airy, and ultimately chewy cookie texture. Cold butter won't incorporate properly, leading to a dense, tough cookie. Overly soft or melted butter can result in greasy, flat cookies that spread too much.
- Flour Measurement Precision: Flour is the structural backbone of your cookie. Inaccurate measurement is a leading cause of texture woes. While a kitchen scale offers the most precise measurement in grams, if you're using measuring cups, technique matters. Lightly spoon flour into your measuring cup and then level it off with a straight edge. Do not pack the flour in or scoop directly from the bag, as this can add up to 25% more flour than intended, resulting in dry, dense, and crumbly cookies instead of the desired chewy perfection.
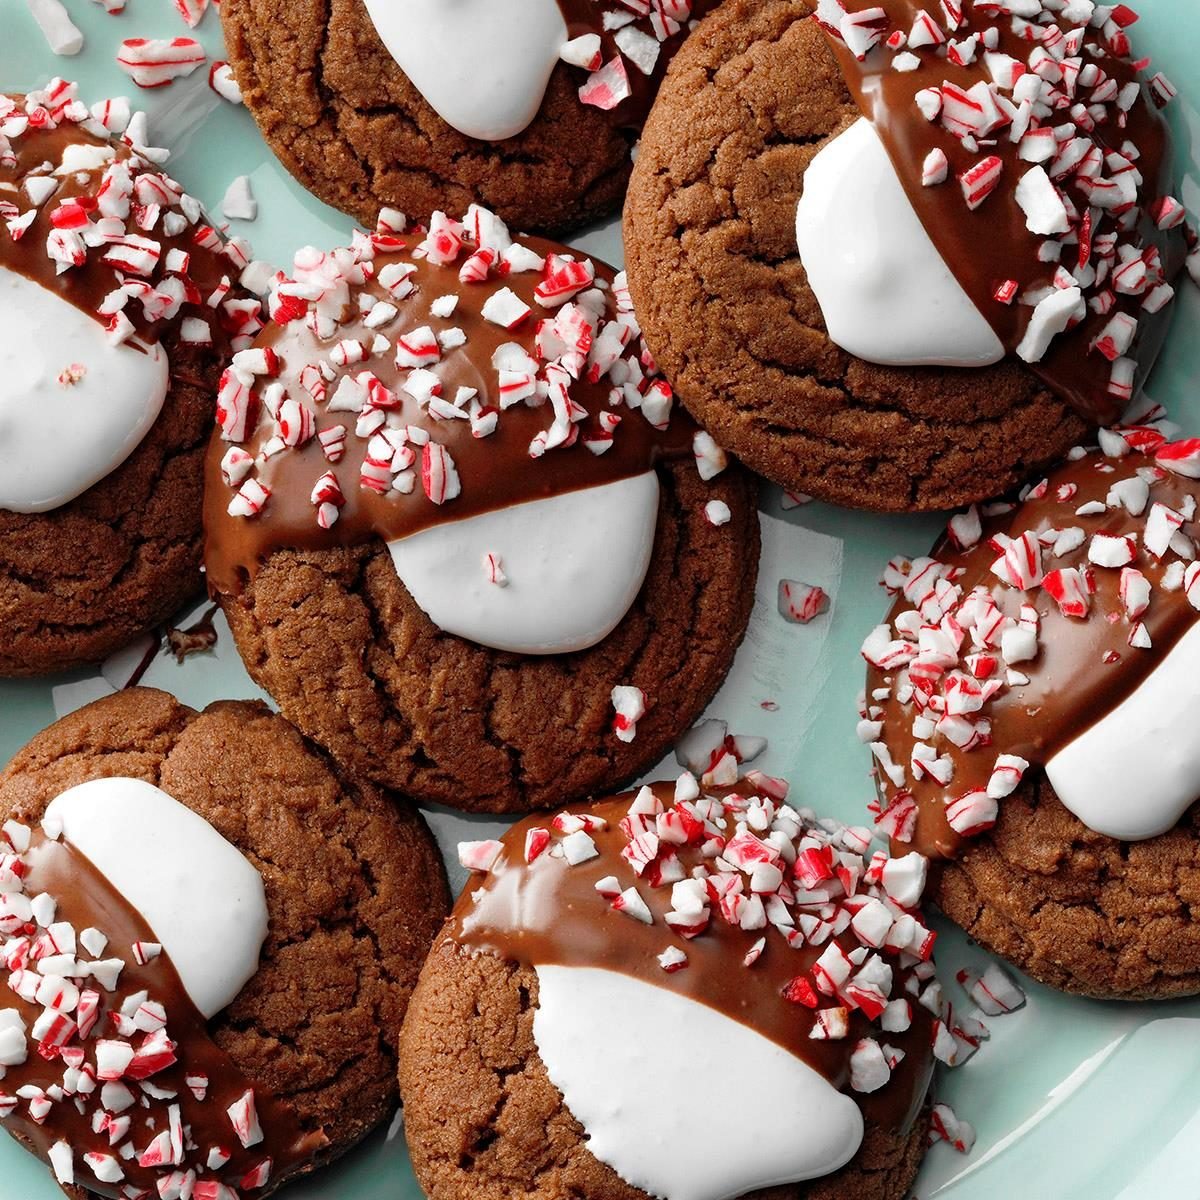
- Marshmallows: The star of the gooey center! Mini marshmallows are typically easier to work with. The key is how you incorporate them. Too early or too much mixing can cause them to break down prematurely. We'll delve into the best technique shortly.
- Sugars: Most recipes for chewy cookies will call for a combination of brown and granulated sugar. Brown sugar adds moisture and chewiness due to its molasses content, while granulated sugar contributes to spread and slight crispness around the edges. Understanding this balance helps you appreciate the recipe's design for optimal texture.
Mastering the Mix: Techniques for Optimal Dough
Beyond the ingredients themselves, the way you combine them directly impacts the chewiness, spread, and overall structure of your peppermint hot chocolate cookies.
- Creaming Butter and Sugar to Fluffy Perfection: Using a hand mixer or stand mixer, beat the room temperature butter and brown sugar together until light, fluffy, and significantly paler in color. This process, often taking about 2 minutes, incorporates air, which contributes to the cookies' soft, chewy texture. Don't rush this step!
- Incorporating Wet Ingredients: Once the butter and sugar are perfectly creamed, add your egg, vanilla, and peppermint extracts. Beat for another minute, ensuring everything is well combined and emulsified. The extracts not only provide the signature flavor but also add a touch of moisture.
- Gentle Introduction of Dry Ingredients: In a separate bowl, whisk together your all-purpose flour, cocoa powder, baking powder, and kosher salt. This ensures even distribution of the leavening and seasoning. Gradually add these dry ingredients to your wet mixture, mixing on low speed until just combined. Overmixing at this stage can develop the gluten in the flour too much, leading to tough, cakey cookies. Stop mixing as soon as no streaks of flour remain.
- Forming Dough Around Marshmallows: This is where many home bakers face a challenge. If the dough is too soft, the marshmallows are hard to encase without making a mess. Some recipes suggest chilling the dough first, but as the reference context highlights, it can be easier to form the dough around the marshmallows prior to chilling. Scoop out about two tablespoons of dough (a 1 oz cookie scoop is ideal), pat it into a flat disc, place 3-4 mini marshmallows in the center, and then carefully fold the sides of the dough up to fully enclose them. Roll the dough ball gently in granulated sugar for an extra sparkle and slight crust.
- The Critical Chill: Once your marshmallow-filled dough balls are formed, they absolutely need time to chill. Refrigerate them for at least 1 hour, or even better, overnight. Chilling does several things for texture:
- Prevents Excessive Spread: Cold dough spreads less in the oven, leading to thicker, chewier cookies.
- Deepens Flavor: The ingredients have more time to meld, resulting in a richer, more complex taste.
- Firms the Dough: This makes it easier to handle and ensures the cookies hold their shape better during baking.
For more delicious takes on these festive treats, you might enjoy Peppermint Hot Chocolate Cookies: Your Winter Drink in Cookie Form, which delves into the sheer delight of turning a beloved beverage into a delectable cookie.
Baking to Perfection: Oven Dynamics & Finishing Touches
The oven is where the magic truly happens, but precise timing and observation are key to achieving that ideal chewy-gooey texture for your peppermint hot chocolate cookies.
- Preheat Thoroughly: Always preheat your oven to the specified temperature (typically 350°F or 175°C) and let it reach that temperature fully before placing cookies inside. An underheated oven can cause cookies to spread too much and bake unevenly.
- Parchment Paper is Your Friend: Line your baking sheets with parchment paper. This prevents sticking, promotes even baking, and makes cleanup a breeze. It also helps with the precise removal of the cookies.
- Proper Spacing: Place cookie dough balls at least 2 inches apart on the baking sheet. These cookies, especially with their gooey marshmallow centers, will spread. Adequate spacing prevents them from merging into one giant cookie blob.
- Baking Time & Visual Cues: Bake for 10-12 minutes. The cookies should appear slightly puffy, with edges that are just set but centers that still look a little soft. Crucially, you'll see hints of melted marshmallow peaking through, creating those irresistibly gooey pockets. Do not overbake! Overbaked cookies will lose their chewiness and become dry and crumbly. The cookies will continue to cook slightly as they cool on the baking sheet.
- Post-Bake Adjustments for Shape: Because of the melting marshmallows and candies, some cookies might spread a bit irregularly. Immediately after pulling them from the oven, while they're still hot and pliable, use the back of a spatula or spoon to gently push in any edges that have spread too far, reshaping them into perfect circles.
- The Peppermint Finish: While the cookies are still warm from the oven, sprinkle crushed candy canes over them. The residual heat will slightly melt the candy, helping it adhere and providing a beautiful festive crunch and an extra burst of peppermint flavor.
- Cooling Process: Let the cookies cool on the baking sheet for 5 minutes. This allows them to firm up slightly before you attempt to move them. Then, transfer them to a wire rack to cool completely. Cooling completely on a rack is important for air circulation, which helps set the texture and prevents the bottoms from becoming soggy.
Troubleshooting Common Texture Issues
Even with the best intentions, baking can sometimes throw curveballs. Here’s how to address common texture problems with your peppermint hot chocolate cookies:
- Cookies are Too Flat/Spread Too Much:
- Likely Culprit: Butter too soft/melted, oven not hot enough, dough not chilled long enough, too much sugar, or flour inaccurately measured.
- Solution: Ensure butter is true room temp, preheat oven fully, chill dough for a minimum of 1 hour (or longer), re-measure flour accurately (spoon and level or use a scale). You can also try adding a tablespoon more flour next time if issues persist.
- Cookies are Too Cakey/Dry:
- Likely Culprit: Overmixing the dry ingredients, too much flour, or overbaking.
- Solution: Mix dry ingredients only until just combined, measure flour precisely, and pull cookies from the oven when edges are set but centers are still slightly soft.
- Not Gooey Enough (Marshmallows):
- Likely Culprit: Marshmallows placed too close to the surface and melted away completely, or overbaking.
- Solution: Ensure marshmallows are fully enclosed within the dough. Bake only until the marshmallows just begin to peek and melt, but not so long they caramelize or disappear entirely.
For more insights into perfecting the combination of chewiness, gooiness, and festive flavor, delve into Irresistible Peppermint Hot Chocolate Cookies: Chewy, Gooey & Festive.
Crafting the perfect peppermint hot chocolate cookies is an art, but one that is easily mastered with a few key techniques and an understanding of your ingredients. By paying close attention to flour measurement, butter temperature, proper dough chilling, and precise baking times, you'll consistently achieve those coveted chewy centers, delightfully crisp edges, and irresistibly gooey marshmallow pockets that make these holiday treats truly special. So go ahead, embrace the joy of baking, and create a batch of these magical cookies that will bring warmth and cheer to everyone lucky enough to try them!
